Showing posts with label Computer Tips. Show all posts

Thursday, November 15, 2012

Convert FAT32 to NTFS Without Losing Data

NTFS and FAT32 are the most common file system of Windows operating system. Before the emergence of NTFS, FAT32 is generally accepted as the most powerful file system to basically satisfy the needs of user. While as the fast development of computer business, FAT32 gradually falls short of the increasing demands of user.

 You have a flash drive or probably an external hard drive that currently has FAT32 file system and you want to change it to NTFS?
 

If your answer is yes then this article for you as it explains exactly how you can achieve seamless transition from FAT32 to NTFS without involving any data loss.


 Why use NTFS Over FAT32?

Let's say you have FAT32 and You want to unrar large file (>4GB) and Windows tells you that you cannot unpack it because you don’t have enough hard drive space. Even if you do, you’ll still generate this error. This is because FAT32 drives do not support large files on it (anything over 4 GB).


 Important:  While this method works perfectly, I would still advise you to backup your data in case anything goes wrong.


 FAT 32 to NTFS Conversion Steps
  •  Press the Start button.
  •  Type cmd in the search bar if you use Windows 7, Windows 8 or Windows Vista. If you use Windows XP, click on Run and then execute cmd. 
You will then see this


  •  Go to your “My Computer” icon, and see the name of the letter that stands in from of the drive you want to convert!
  • Type "chkdsk j: /f " (without quotes) where J is the letter of the drive to undergo conversion and press Enter. This checks the drive for errors and fixes them automatically.
 See the figure below


  • Type "Convert J: /FS:NTFS" (without quotes) and press Enter. J is again the letter of the drive  to be converted. 
 See the figure below


  • The command prompt will start the conversion process and after a few minutes, CMD will say that conversion was successful.  
  • You can check it in the properties of the drive through right click<Properties.  

See the figure below


That's all.This works on Windows 7, Windows XP, Windows 8 and Windows Vista. I converted my flash drive's file system using these steps and it worked flawlessly.

Note: Once you convert a drive or partition to NTFS, you cannot simply convert it back to FAT or FAT32. You will need to reformat the drive or partition which will erase all data, including programs and personal files, on the partition

I hope you like this article.If you need further help feel free to ask.Like us on Facebook and subscribe via email to get latest updates.Enjoy!!
          

Monday, November 12, 2012

Windows 8 Pro Activator Final

Hello friends,I am going to tell you how to activate your Windows 8 "Professional" Edition.


Recently,Microsoft unveiled the "Professional" version of Windows 8. This is the Latest New Windows 8 100% Working Activator.Try it Now and Activate Your Windows 8 Pro, Enterprise and Core Final Edition.Follow the procedure below to activate your Windows 8.


System Requirements For Windows 8 Professional

  • Processor: 1 gigahertz (GHz) or faster.
  • Ram memory: Minimum 1 gigabyte (GB).
  • Hard Disk: 16 GB for 32-bit and 20 GB for 64-bit.


This Activator Features:

  • Fully Unlocked,
  • Personalization.
  • Start Screen.
  • Account Picture.

  Instructions
  • Run as Administrator.
  • Wait for the Process and don't do anything.
  • It restarts automatically.

After restart your windows 8 will activate.Enjoy!!

Supported Version 
  • Windows 8 Professional
  • Windows 8 Enterprise
  • Windows 8 Core 
                                                                                                                                                                    Download Link

I hope you like this post. Like us on Facebook and subscribe via email to get latest updates.Peace out!!
 

Sunday, November 11, 2012

How to Dual Boot Windows 7 and Windows 8?

In this tutorial I am going to show you how to dual boot Windows 7 and windows 8.
With dual boot you can use both operating systems, side-by-side, until you're comfortable enough with Windows 8 to go all in. To configure your PC for dual-boot, all you have to do is create a new partition for Windows 8, then install it.

Before you go one step further, make sure you have a complete backup of your hard drive, just in case things go wrong. This is a pretty safe operation, go to my Windows Back up post and back up your system.

So, the first step on creating a dual boot is creating a partition for our Windows 8 installation

To create a partition , go to My computer icon >> right click and then click on manage.

After this click on Disk management option and a prompt will open like figure below.

Here we need to create a partition to install windows 8. To create the partition just right click on volume C and then click on shrink volume.


When you click on shrink  volume, its going to Queying the hard drive for available shrink space.


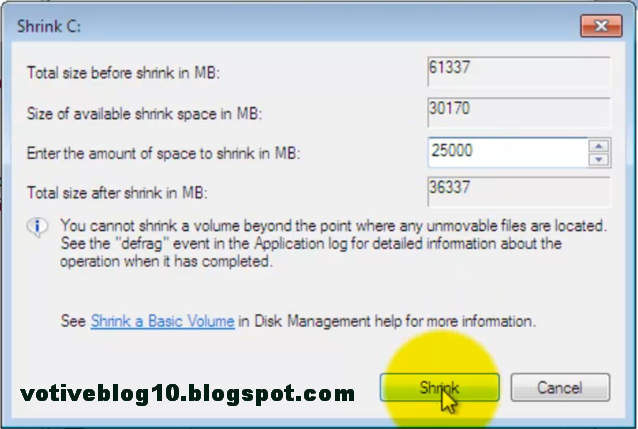
Here you can select the size of the partition. Your partition must have 16 GB or more than 16 GB. Make sure 16 GB and more than 16 GB is recommended partition space for Windows 8.

Give the partition space and now click on shrink.


Now once you have created the partition you have to make sure that you can identify the partition. You can Format or rename and however you can do anything to identify the partition.

Now insert the Windows 8 disk into the drive and restart the computer. When you restart you should be able to see press any key to boot from CD or DVD.


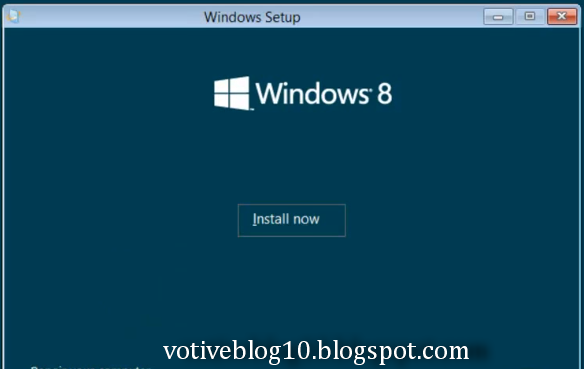
After this click on NEXT and then click on Install now.


Insert the Product Key and then click NEXT.


Here you select the partition which you initially created to install Windows 8 and click NEXT.


After this the Windows installation prompt will open and during the installation your computer will restart several times.


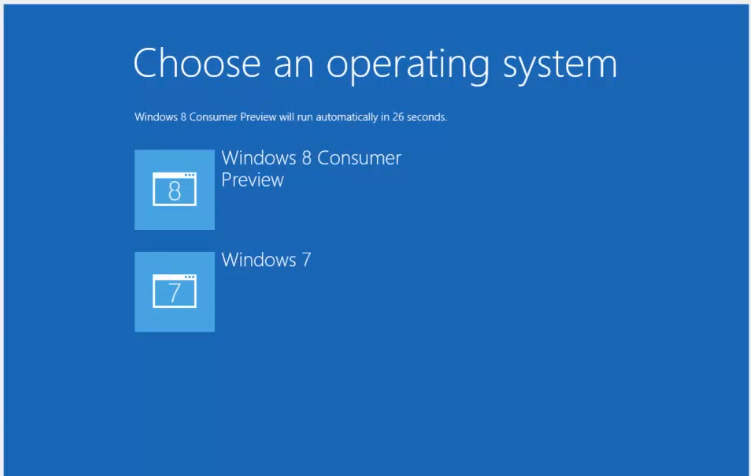
After completing the whole Windows installation procedure a prompt will open like a figure below, where we can choose which operating system to start either windows 7 or windows 8.


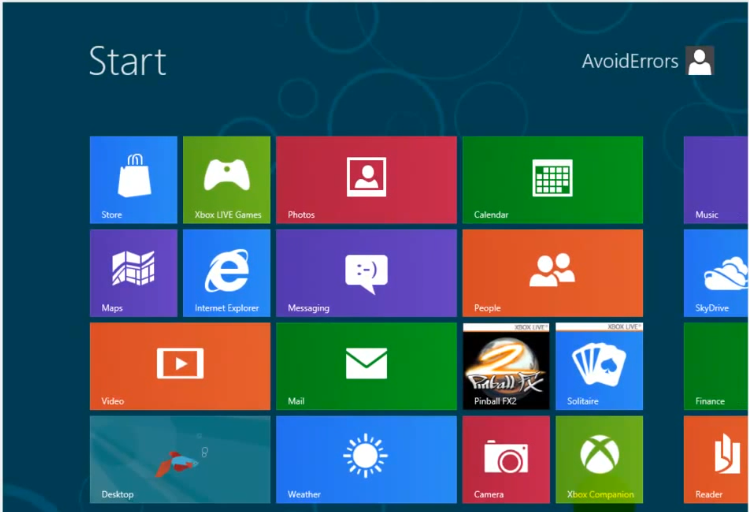
After some personalization and Finalization procedure we will have Windows 8 on the same computer which also running Windows 7.


Now if you want to delete your Windows 8 and want to operate only Windows 7 operating system  again just go to Disk management and select the partition where you installed your Windows 8 >> right click on the volume and then select delete.


Then if you wanna go back to the full hard drive >> right click on drive C >> then click on Extend volume>> then click next , make sure you have the partition selected >> then click next >> and then click Finish.


Now when you restart your computer, you will not see the choose operating system massage.

That's All

I hope you like my post.If you have any problem feel free to comment below. Please Like us on Facebook, Follow us on Twitter and Subscribe via Email. 

Saturday, November 10, 2012

How to Hide Drives on Your Windows?

Many people has given their tutorials on this topic (how to hide drives on Windows 7)  but the procedure is too long, boring and irritating. But no matter, I am going to show a very simple and easy process, how to hide drives on your windows not in windows 7 but also on Vista and XP. So lets start the procedure..


First of all you need to download NoDrivesManager software from the Download button below:

Download


Install this software and open:
 

If you want to hide your drive C and D like in the figure below:


Just select the drive C and D and click on save changes. A prompt will open then click OK then log off your computer and log back in.


After log in back, open My computer and you will see your drives are hidden just like the figure below:


Don't worry you can access to your drive by pressing  ( windows key+R ) and then type your drive letter C or D and you can see the contents of your hidden drive.


Now if you want put your drive back. Re Open NodriveManager >unselect your selected drives > save changes > click Ok. After this log off and then log in to your computer. you will see your drives when you open My computer. Enjoy!!

I hope you like this article.Like us on Facebook and subscribe via email to get latest updates.


Thursday, November 8, 2012

Shortcut keys for Microsoft office 2010


In my previous post I described how to add password to office 2010. In this article I will share with you almost all Microsoft Office 2010 shortcut keys.Microsoft Office 2010 provides hundreds of commands. I have compiled complete shortcut keys for Microsoft office 2010, to help MS Word fans. Here is a short list of shortcuts available in Word 2010.

Here is the example of  some Shortcut keys for Microsoft Office 2010. To view complete shortcut keys:

Please download a file from the Link which i give at the end of the post. Enjoy!!

 Keys
Behavior
CTRL+SHIFT+A
converts the selected text to capital letters or vice versa
CTRL+SHIFT+F
Displays the Font dialog box.
CTRL+SHIFT+G
Displays the Word Count dialog box.
CTRL+SHIFT+S
Displays the Apply Styles task pane.
ALT+R
Displays the Review tab
ALT+CTRL+1
Apply Heading 1, Similarly ALT + CTRL + 2 will   apply heading 2
CTRL+SHIFT+L
Applies Bullets
CTRL+SHIFT+F5
Bookmark
CTRL + B
Bold Text
CTRL + I
Italic Text
CTRL + U
Underline Text
CTRL+PAGE DOWN
Browse Next
CTRL+E
Navigate to the center Paragraph
CTRL+SHIFT+ENTER
Column Break
CTRL+SHIFT+C
Copy Format
ALT+SHIFT+F7
Dictionary
ALT+CTRL+S
Splits the Document
CTRL+SHIFT+D
Double Underline
CTRL+END
End of Document
END
End of line
CTRL+SHIFT+P
Font size select
SHIFT+F5 or ALT+CTRL+Z
Go Back to previous state


ALT+SHIFT+R
Header Footer Link
CTRL+K
Hyperlink
CTRL+M
Indentation
CTRL+J
Justifies Paragraph
ALT+F8
Inserts Macros
ALT+SHIFT+K
Mail Merge Check
F10
Menu Mode
ALT+F7
Moves to the Next Misspelling
CTRL+H
Replace
CTRL+P
Print
CTRL+SHIFT+F12
Also launches Print
ALT+SHIFT+BACKSPACE
Redo
F12
Save As
CTRL+SHIFT+K
Small Caps
CTRL+SHIFT+S
Style
SHIFT+F7
Thesaurus
ALT+SHIFT+T
Time Field
CTRL+SHIFT+M
Unindent
================================================================


I hope you like this post.If you have any problem regarding this post then let me know.Like us on Facebook and subscribe via email to get latest updates.Peace out!

Wednesday, November 7, 2012

Install Windows 7 Via USB Storage

Windows Vista and Windows 7 can be installed via a bootable USB drive as well. And the installation would be much easier and faster than installation via DVD. Windows Server 2008 & Windows Server 2008 R2 also can be installed via USB drive except installation of Windows 7 & Windows Vista .Initially Windows Vista/7 DVD or installation source (setup backup files stored on local hard disk) & a 4GB USB 2.0 Storage device would be required. You can follow the steps to install Windows Vista/7 from USB Drive.


1. Plug your USB storage device and run CMD and execute the following commands one after another.

o  Diskpart
Run Disk partition utility
 

o  List disk
To get disk index that is used to perform disk partitioning.
 

o  Select disk 1
Selects disk to perform disk partitioning.
 

o  Clean
Flush your existing all USB drive’s partitions.
 

o  Create partition primary
Creates a partition as primary partition.
 

o  Format recommended
Format your USB drive with recommended parameters. (No need
to worry about file system format) 
 

o  Active
Set the partition as active to hold bootmgr. 
 

o  Exit
To quit Diskpart utility


2. After executing the above commands simply copy all Windows Vista/7 files from DVD/Backup storage to USB storage device.

3. Change boot settings from BIOS and set it to boot with your USB drive, you can install Windows Vista/7 via bootable USB storage device. That is it.

Note: For boot problems try Fixing your USB Storage drive with the command  I:\Boot\Bootsect.exe /NT60 I: where I: is the drive letter of USB storage device

I hope you like this article.If you need further help regarding this article then just drop your comment below.Please like us on Facebook and subscribe via email to get latest updates.

Sunday, November 4, 2012

Add password to documents in office 2010

Sometimes you need to keep your important documents secure so only certain individuals can read and edit them. Microsoft office 2010  help users to prevent the files from unauthorized access by providing the feature of “Encrypt with Password”, which allows users to make their files password protected.This step-by-step guide describes how to set (and remove) a password for documents in Microsoft office 2010.


Note:  In this post I am using a Word document, but the process of encryption is the same in Excel and PowerPoint.


How To Password Protect A Word or Excel 2010 Document Using Built-in Office Encryption

Step 1
  • Open your document.
  • Click the File tab, then Click Info.Under “Permissions” click on “Protect Document” > “Encrypt with Password”


Step 2
  • The Encrypt Document dialog will appear, Type in a strong password and then Click OK to finish.
  • Re-enter your password in next step and then hit OK.


  • You will also observe the following message


  • Press Ctrl + S to save your document. Now your file is password protected and no one can open it without entering password.
  • Now when you or someone else tries to open the document, the correct password will need to be entered to access it.


To remove password from document:


  • Open your document.
  • Provide the password and click “OK” to access the contents.


  • Go to File->Info->Permissions->Encrypt with password.


  • The following screen will display which contains your file’s password, so simply select the password and delete it and click “OK” button.


  • Your document is now password free and open for everyone to read and edit.Press Ctrl + S to save your document
.
Conclusion 

If you have important documents that you don’t want just anyone to be able to edit or access then Encryption is nice tool that will let you protect them. 


I hope you've learned something from this post.Questions and comments are always welcomed, Also sharing this post with others means caring us.Please like us on Facebook and subscribe via email to get latest updates.Stay connected.

Thursday, November 1, 2012

windows backup for window 7

Windows Backup allows you to make copies of data files and also create a system image which includes your system settings, programs and files. In Windows 7, you can choose your custom location for the data backup and whether or not to include the system image during backup.The Windows Backup program (Sdclt .exe) is installed by default in all editions of Windows 7 .

 For your first backup, you can start from either of the following two locations:


  • Under the Maintenance heading in Action Center, click the Set Up Backup button 
  • In Control Panel, click Backup And Restore under the System And Security heading, and then click the Set Up Backup link, as shown in Figure below.
                                                         
                                                
1. Select a destination where your backup will be saved .The Set Up Backup dialog box, shown in Figure below , lists all available destinations .Note that the system volume(Operating System Volume) is not included in this list.


                                                                                Now Choose The Following criteria
  •  A separate volume on the same internal hard drive that holds your system volume.But we strongly advise against this option,because in the event of a physical disk failure your backup files will be wiped out at the same time as the originals
  • An external hard drive

This is the simplest and best option .The external drive can connect to your PC via a USB 2 .0, IEEE 1394, or eSATA cable .You can leave the drive permanently attached to your PC so that scheduled backups happen regularly, or you can unplug it after the backup is complete and then store it in a secure location such as a fireproof safe or a locked cabinet .For extremely valuable data, consider storing the backup drive offsite.

  • Removable media such as writable CDs or DVDs

This option is available only if you are performing a one-time image backup; you can’t define a sched-uled backup using removable media .Windows Backup will prompt you to swap media as needed .This option is especially useful after you perform a clean installation and before you add any data files.

2. Choose a backup type .The easy option is the first one shown here: Let Windows Choose (Recommended) this option is selected by default.But it is completely up to you what you do choose.

Note:  If you let Windows choose it will not backup Program Files, anything formatted with the FAT file system, files in the Recycle Bin, or any temp files that are 1GB or more. 


But if you want to select ( Let me choose) option then you will  reach the What Do You Want To  Back Up window .That opens a dialog box like the one shown in Figure below.


  •  In the Above Figure, Select the files and folder to include in the backup.  Also notice you can select the option to create an image of your local drive.

Now review your backup settings and make sure everything looks correct.


3. Now, Create a backup schedule

By default, the Windows Backup program will run automatically, using the same settings you just saved, at 7:00 PM every Sunday night .If you prefer to back up more or less frequently or at a different time, click Change Schedule on the Review Your Backup Settings page to open the How Often Do You Want To Back Up window shown next


You can manually edit the scheduled task if you want an option that isn’t listed here.You can choose Daily, Weekly, or Monthly backups, picking a day of the week or a date each month and a fixed time when the automatic backups will take place. After the original full backup, updates to your backup set include only files that have changed since the last backup.

After the initial setup is complete, click Save Settings And Run Backup to perform the backup operation. Your Backup And Restore Control Panel dis-plays its progress, as shown here:


While a backup is in progress, you can click View Details to see more information and to stop the backup.


When the backup is complete you will see the two backup files and image folder if you created one. 


NOTE: In the next Article I will Teach How To Restoring Files from a Backup Set, Customizing a Backup and Creating a System Image Backup. So keep visit votive Blog to get latest updates about Blogger and other Computer Tricks.


I hope you like this article. If you have any problem do comment below. Please Like Us on Facebook and Subscribe via Email to get latest updates.