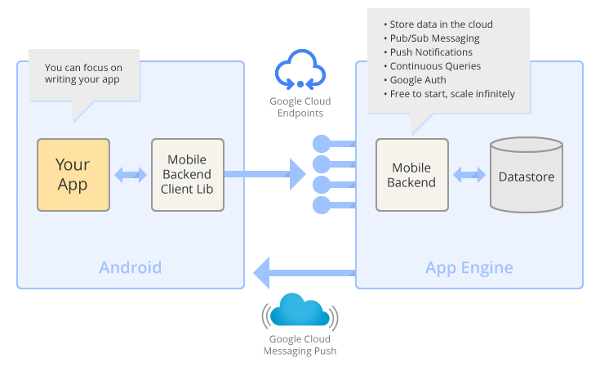
Android Studio lets you easily add a cloud backend to your application, right from your IDE. A backend allows you to implement functionality such as backing up user data to the cloud, serving content to client apps, real-time interactions, sending push notifications through Google Cloud Messaging for Android (GCM), and more. Additionally, having your application’s backend hosted on Google App Engine means that you can focus on what the cloud application does, without having to worry about administration, reliability or scalability.
When you create a backend using Android Studio, it generates a new App Engine application under the same project, and gives your Android application the necessary libraries and a sample activity to interact with that backend. Support for GCM is built-in, making it easy to sync data across multiple devices. Once you've generated the project, you can build and run your client and server code together, in a single environment, and even deploy your backend code right from Android Studio.
In this post we’ll focus on how to get started with the basic setup. From there it's easy to extend the basic setup to meet your needs.


Preliminary setup
Before you get started, make sure you take care of these tasks first:
- Download Android Studio if you haven’t done so already and set it up.
- Make sure you have an application project set up in Android Studio. You can use any working app that you want to integrate with your backend, even a sample app.
- If you'll be running the app on an emulator, download the Google APIs Addon from the SDK Manager and run your app on that image.
- Create a Google Cloud Platform project: In the Cloud Console, create a new project (or reuse an old one) and make note of the Project ID. Click on the words “Project ID” on the top left to toggle to the Project Number. Copy this as well.
- Enable GCM and obtain API Key: In the Cloud Console, click on APIs and turn on the Google Cloud Messaging for Android API. Then, click on the “Register App” button on the top left, enter a name for the app, then select “Android” and “Accessing APIs via a web server”. In the resulting screen, expand the “Server Key” box and copy the API key.
1. Generate an App Engine project
In Android Studio, open an existing Android application that you want to modify, or create a new one. Select the Android app module under the Project node. Then click Tools > Google Cloud Endpoints > Create App Engine Backend.
In the wizard, enter the Project ID, Project Number, and API Key of your Cloud project.

This will create:
- An App Engine project which contains the backend application source
- An endpoints module with a
RegisterActivityclass, related resources, and client libraries for the Android app to communicate with the backend
The generated App Engine application (<app_name>-AppEngine) is an Apache Maven-based project. The Maven pom.xml file takes care of downloading all the dependencies, including the App Engine SDK. This module also contains the following:
- A Google Cloud Endpoint (
DeviceInfoEndpoint.java, auto-generated fromDeviceInfo.java) that your Android app will “register” itself through. Your backend will use that registration info to send a push notification to the device. - A sample endpoint,
MessageEndpoint.java, to list previously sent GCM messages and send new ones. - A starter web frontend application (index.html in webapp directory) that will show all the devices that have registered with your service, and a form to send them a GCM notification.
The endpoints module (<app_name>-endpoints) generated for you contains the classes and libraries needed by the Android application to interact with the backend:
- A
RegisterActivity.javaclass that, when invoked, will go through the GCM registration flow and also register itself with the recently created backend throughDeviceInfoEndpoint. - Client libraries, so that the application can talk to the backend using an object rather than directly using raw REST calls.
- XML files related to the newly created activity.
2. Add GCM registration to your app
In your Android application, you can call RegisterActivity whenever you want the registration to take place (for example, from within the onCreate() method of your main activity.
...
import android.content.Intent;
...

@Override
    protected void onCreate(Bundle savedInstanceState) {
        ...
        Intent intent = new Intent(this, RegisterActivity.class);
        startActivity(intent);
    }
3. Deploy the sample backend server
When you're ready to deploy an update to your ( the sample ) production backend in the cloud, you can do that easily from the IDE. Click on the “Maven Projects” button on the right edge of the IDE, under Plugins > App Engine, right-click and run the appengine:update goal.

As soon as the update is deployed, you can also access your endpoints through the APIs Explorer at http://<project-id>.appspot.com/_ah/api/explorer.

For testing and debugging, you can also run your backend server locally without having to deploy your changes to the production backend. To run the backend locally, just set the value of LOCAL_ANDROID_RUN to true in CloudEndpointUtils.java in the App Engine module.
4. Build and run the Android app
Now build and run your Android app. If you called RegisterActivity from within your main activity, the device will register itself with the GCM service and the App Engine app you just deployed. If you are running the app on an emulator, note that GCM functionality requires the Google APIs Addon image, which you can download from the SDK Manager.
You can access your sample web console on any browser at http://<project-id>.appspot.com. There, you will see that the app you just started has registered with the backend. Fill out the form and send a message to see GCM in action!
Extending the basic setup
It's easy to expand your cloud services right in Android Studio. You can add new server-side code and through Android Studio instantly generate your own custom endpoints to access those services from your Android app.